Product Manual
This operations manual describes the processes and procedures necessary to unpack, install, operate, and maintain a Squish-o-Matic 1000 Cartridge Capping Machine.
Table of Contents
Unboxing & Installation
Congratulations on purchasing a new Squish-o-Matic 1000! Begin by preparing the area in the manufacturing facility where the Squish-o-Matic 1000 is to be installed. The area should be level and have at least 3’/1m clearance in front to allow for the Squish-o-Matic doors to open. Ensure the area is located within 5’/1.5m from an electrical outlet (NEMA5-15R,110v AC, single phase).
*INSTRUCTIONS ARE FOR REFERENCE ONLY*
Scheduling a remote installation and training session with Vape-Jet support prior to operation is required. The below procedures should never be performed without a Vape-Jet representative on the line. Please submit a help desk ticket, call 971-606-3420, or email [email protected] to set up an appointment.
Unboxing Checklist
- 1x Squish-o-Matic 1000 Cartridge Capping Machine
- 1x AC power cord (NEMA 5-15P to IEC320C13)
- 1x Jig system for 510 style cartridges
- 2x Aluminum plates
Materials
- Box cutters or scissors
- Claw hammer or crowbar
- Bubble level
- Calipers
Procedure
- Using a claw hammer or crowbar, carefully remove the top of the wooden shipping container, and set it aside. *CAUTION: There may be exposed nails on both the removed top and the shipping container.
- Perform a 2 (or more) person lift to stand the Squish-o-Matic to its proper upright position while still in its shipping container.
- Using a box cutter or scissors, cut the plastic strip that secures the Squish-o-Matic to the shipping container, before removing and throwing it away.
- Carefully wheel the Squish-o-Matic out of the shipping container and onto a level floor.
- Wheel the Squish-o-Matic to its predetermined installation location, then lower each of the four feet by spinning the wheel lock (red cog) counter-clockwise until each wheel is off the ground, and the Squish-o-Matic is immobile and level.
- Remove the thin plastic film that covers the Squish-o-Matic’s viewing windows & doors.
- Open the front transparent doors. Visually inspect the outside and inside of the Squish-o-Matic for any obvious shipping damage.
- Remove the two aluminum blocks, 4 alignment pins, and jig that are located inside the Squish-o-Matic. The plastic wrap can be removed, and the items can be set to the side.
- Install the power cord from the left side of the Squish-o-Matic to a properly wired and properly grounded NEMA 5-15R (110v AC, single phase)
- The Squish-o-Matic can be powered on by turning the red power switch clockwise, to the ‘ON’ position. The white LED lights will remain on when the Squish-o-Matic is powered on.
Safety Concerns
WARNING! Crush Hazard.
Moving parts can entangle, pinch, or cut you, causing death or serious injury. Before operating this machine in anyway, you must verify that all body parts, long hair, and clothes are clear of the machine’s extent of motion.
WARNING! Electrocution Hazard.
Points in the electrical cabinet contain high voltages, which can electrocute or shock you, causing death or serious injury. Even after the machine is powered off, electronic devices in the electrical cabinet can retain dangerous electrical voltages. Use caution when servicing the machine inside the electrical cabinet.
Personal Protective Equipment Always wear protective safety eyewear. Before operating this machine in anyway, you must verify that your eyewear is impact-resistant and rated for ANSI 787+
Operator Knowledge
Before operating this machine in any way, you and all other operators must read and understand all instructions. If you don’t, there’s a risk of voided warranty, property damage, serious injury, or death. (*Scheduling a remote installation and training session with the Vape-Jet support team prior to unboxing and operation is required. Please submit a help desk ticket, call 971-606-3420, or email [email protected] to set up an appointment.)
- Never allow the machine to run unattended.
- Keep the work area clean and free of clutter.
- Machine motion can occur if controls are accidentally activated while the machine is powered on.
- Never leave tools or other loose items inside the machine.
- Never operate the machine with the electrical cabinet door open.
- Never operate the machine with the pressing area doors open.
- Never reach into the pressing area while the machine is operating.
- Never modify, defeat, or bypass safety devices or interlocks.
- Never obstruct the Emergency Stop button or any other controls.
- Never operate the machine while tired or otherwise impaired.
- Never allow untrained operators to install, operate, or maintain the machine.
Inspection & Operation

Function
- Power socket – Only use supported power cord (NEMA 5-15P to IEC320C13)
- Power switch – Self-locking power switch with indicator light
- Squish button – Begins the squishing/pressing process of lowering the pressing plate
- Top pressure plate – This is the top pressing plate that lowers and is used for pressing products
- Adjustable bottom pressure plate – This is the bottom pressure plate, which can be moved up and down via the bottom pressure plate lifting adjustment knob. The height can be fine-tuned with an adjustable range of 0-5mm(±2.5mm)
- Bottom pressure plate adjustment knob – This knob can adjust the vertical movement of the bottom plate (clockwise is upward, counter-clockwise downward)
- Door with door locks – For safety reasons, the doors must be closed during operation. The knobs can be pushed inward to engage the door locks.
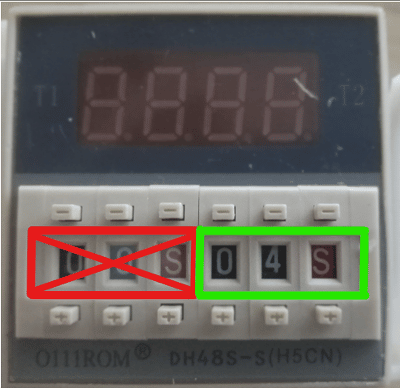
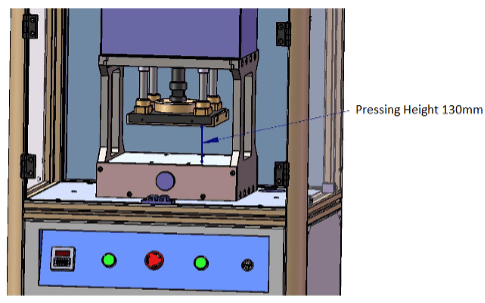
- SQUISH timer – This time relay (right side) controls the amount of time that the top pressure plate presses down. Once the time expires, or max pressing height (130mm @ 3.7 seconds) is reached, the top pressure plate dwells before automatically rising to the original position.
- Lift button – Begins lifting the top pressure plate
- Emergency STOP button – In case of emergency, you can press this button to immediately stop the machine. To reset, rotate the STOP button clockwise.
Pre-Operation Inspection
- Inspect the NEMA 5-15P to IEC320C13 power plug at the Squish-o-Matic to ensure that it is plugged in correctly, is not loose, and is free of any damage.
- Ensure that the Squish-o-Matic is plugged into a properly wired and properly grounded AC outlet (NEMA 5-15R, 110v AC, single phase)
- Inspect for oil leaks in the pipelines of the equipment
- Inspect the work area before each use. Make sure it is free and clear of any potential hazards.
Operation Guide
After equipment inspection has been completed, if everything is normal, power the Squish-o-Matic on by turning the power switch clockwise to the ‘ON’ position.
Dry run (no-load operation):
- Begin by ensuring that there is nothing between the top and bottom pressure plates, and that the doors to the Squish-o-Matic are closed.
- Press the SQUISH button.
- Observe how the pressing timer will start to count, the top pressure plate will move downwards, and once the time has elapsed, the top pressure plate will halt before rising and returning to its original position. This completes your dry run (no-load operation).
Setup Method Option #1
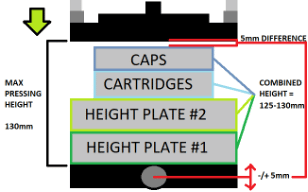
For combined heights between 125-130mm tall using default SQUISH time of 4 seconds:
- Using calipers, determine individual height of cartridges, caps, and height plates.
- Rotate the bottom pressure plate adjustment knob counterclockwise so that the bottom pressure plate rests at its lowest point.
- Utilize the included aluminum height plates to get the distance between the top of an already capped cartridge and the pressing height of the top pressure plate to less than 5mm. This means that the combined height of the aluminum height plates, uncapped cartridges, and cartridge caps will need to be between 125-130mm. The 5mm difference between the combined height and the pressing height of the top pressure plate can be adjusted via the bottom pressure plate adjustment knob.
- Once configuration of the top pressure plate has been completed, prepare a jig of unpressed cartridges and caps, then place them into the machine to be capped.
- Press the SQUISH button. When the machine begins to operate, observe the top pressure plate when pressing down to determine whether the top pressure plate caps the cartridge. If the cartridge was not completely capped, the bottom pressure plate adjustment knob can be turned clockwise to lift the bottom pressure plate up to 5mm, until the cap of the cartridge is pressed into place.
Setup Option Method #2
Determining the correct SQUISH time for combined heights between 130mm-175mm tall:
- Using calipers, determine combined height of cartridges, caps, and height plates.
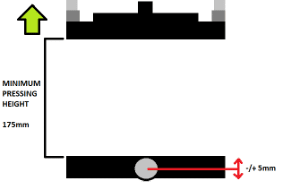
- If combined height is between 130-175mm, use the below graph to choose the time setting that does not meet or exceed your combined height. (e.g., if your combined height is 150.70mm, the closest SQUISH time value without meeting or exceeding that height would be 1.9s, which has an associated pressing height of 151.82mm. This leaves roughly 1.12mm of space between the top pressure plate and the cartridges, which can be adjusted via the bottom plate adjustment knob (-/+5mm))


As shown in the figure above, the left side, outlined in red, is NOT USED, while the right side, outlined in green, is the SQUISH timer. The SQUISH timer controls the amount of time that the top pressure plate travels downward. Once the time expires, or max pressing height (130mm) is reached, the top pressure plate dwells before automatically rising to the original position. The time setting can be adjusted above and below the number (adjustment keys “+”, “-“). The time unit modes available are: “0.1S”, “S”, “0.1M”, “M”, “0.1H”, and “H” as shown on the right; the measurement of time can be changed through the up and down of the time unit.
Default setting = [NOT USED 00S | SQUISH timer 04S]
Troubleshooting
Issue | Causes | Part Involved | Solution | |
Main power switch ‘ON,’ no indicator lights illuminated inside pressing area | Power cord is loose or unplugged from chassis or electrical outlet | Power supply | Plug in the AC power cord (NEMA 5-15P to IEC320C13) | |
Blown fuse | Power interface | Replace 5A fuse (Replacements included) | ||
Bad power switch | Power switch | Contact Vape-Jet support | ||
No functionality when pressing the SQUISH or LIFT button | Emergency STOP button engaged | Emergency STOP button | Reset the emergency STOP button by turning the button clockwise. | |
Control board has malfunctioned | Control board | Contact Vape-Jet support | ||
System Specifications
Input Voltage(V) | 110VAC 60Hz |
Power | 0.8KW |
Max Height of Top Pressure Plate | 175mm |
Max Travel of Top Pressure Plate | 45mm |
Max Pressing Height of Top Pressure Plate | 130mm |
Working Pressure(KG) | 7500KG |
Control | Hydraulic |
Size | 650x500x1320mm |
Weight | 120kg |
Operating Temperature | Temperature 10~40℃ |
OM1.0 – 8/20/2021 – Initial Release


